Minggu, 17 Agustus 2008

Assistants' Notes: Dark-Room Clock

How to Construct a Dark-Room Clock.

A clock to measure the seconds, the face and fingers of which be plainly seen in the dark room, is a most desirable and useful ring. But one specially made for the purpose at the present time is rather an expensive item. The following instruction will enable any photographer to adapt an ordinary clock at vary little cost. Any make or sue will do providing it has a good, bold, white dial and a minute finger, and is one without a which will go in any position like a watch. Unless it has a finger it will be of no use for our purpose. It does not how old the movement is or bow defective it’s time-keeping qualities; these are of no consequence. If we have not one in our one can be picked up very cheaply, often for a few at a clock repairer's or secondhand stores.
Having secured this, we can proceed with the work of converting into a dark-room clock.

Carefully take the movement out of the case, noticing particularly bow it m fixed in, and remove the fingers. Sometimes this latter has to be done before the movement will come out of the case. All screws, washers, fingers, ate, should be put into a purser or small tray so that they will not get lost, as they will be required later. We should now carefully look at the works and notice just those wheels and spindles which are required to keep the clock going and the minute finger moving. All the rest of the movements are not required by us, and are better taken out. The beet way to take these out without disturbing any other works is to cot through the spindles which carry the wheels with a three-cornered file anywhere where it is convenient. They can then easily be taken out. When all the unnecessary parts have been removed we shall have a clock which, when going, only takes round the minute band. The dial should now be pot back on the clock in such a manner that the centre of the dial where the hour hand was should be fixed over the minute finger movement. This may necessitate a little cutting of the dial, etc., or other parts, to allow it to fit in its right position, but can easily be accomplished. When this is fitted in position the long; finger is carefully soldered on to the minute finger and blacked, the minute finger placed in position, and the whole movement put back into the case. We have now a clock which takes just one minute for the finger to go completely round the dial, and each of the hours five seconds. The dial being of a large size and white, and the finger black, it is very easy to see and count the time in the dark room. Of course, the clock will go with once winding as long as ever it did.

The British Achievement In Aeroplane Cameras.

The progress made during the war in the design and manufacture of cameras for photographing from aero planes has hitherto remained undisclosed except by the few and somewhat sensational statements which were published now and again in the lay Press, and which, it may be said, were usually wide of the mark. Misers, Brock and Holat, in the paper which we reprinted in our issue of February 21 last, made certain sweeping claims to priority which in the following issue provoked denial n the part f two correspondents, both exceptionally well-informed as to what has actually been done in the production of cameras for the British air forces. Since the appearance it paper we hare had an opportunity of inspecting at the Kid Brooke camp of the Royal Air Force cameras representing the whole range of instruments which have bean used daring the war from the earliest days until its termination. The paper by Major Charles W. Gamble at the Optical Society on March 13 last has also set forth in try great detail the steps by which aero plane photography has been raised to great stats of perfection. It is therefore well that tone account be given of what has been accomplished and of the stages through which the aerial camera has passed.
At the outbreak of war photographs bum aero planes or airships had been taken only in quite a casual and amateur way, and the military authorities were low to recognize the great service which aerial photographs would reader to the Intelligence Branch of the Army. Within a law months, however, the value of the aerial photographs received recognition, and cameras specially made for the purpose were first need early in 1915. The first or A model, long since abandoned, was of a quite primitive type, consisting of wooden square-section cone-shaped body, carrying a lens of eight or tea inches local length and fitted with a Mackenzie- Wisbart adapter for envelopes taking 5x4 plates- The camera had to be held in the hand and pointed vertically or obliquely downwards by the observer as he stood up in the aero plane. The Mackenzie-Wisbart system allowed of a considerable supply of plates being taken up, but the relative fragility of the envelopes in the circumstances of their being handled by a wearer of thick gloves, coupled with a want of sufficient precision in bringing the plate accurately into the local plane of an f/4.6 lens, caused this form f plate-holder to be abandoned.
Early in 1916 a modified pattern, the C model, of the first instrument was put in the hands of airmen. It differed chiefly from the previous model in the means adopted for holding and changing the plates. The camera was fitted with two magazines, one containing eighteen 6x4 plates, in metal heaths, which was placed immediately over the local plane, and the ether (empty) magazine below it and to one side, the camera, of course, pointing downwards. By means of a horizontally moving metal plate, the lowermost of the plates awaiting exposure was pushed to one side and was received in the lower magazine, the operation of thus changing the plate also reciting the local-plane shutter under cover of the moving metal plate. The principle of mechanically changing plates by discharging from a holder placed mouth downwards into one placed mouth upwards has been retained in later models in which the changing mechanism it self has been further improved.
The two foregoing cameras mere both of wood, the disadvantage of which, as pointed out by Major Gamble in his paper, was the liability to expand or contract under the very wide range of temperature and climatic conditions to which the cameras are exposed. Inasmuch as a very slight alteration of the distance between an f/4.5 lens and the sensitive surface may disturb the definition, recourse was had to cameras of all-metal construction or to one consisting of wood framework, constructed so as to obviate expansion and covered with metal mounted thereon so as to cause no stresses in the structure in the event of its expansion. The E camera of the R.F.C.; introduced in 1917 was an all-metal camera of this type, and was fitted with a changing mechanism similar to that of the C model, but with the difference that the plate was changed by pulling a cord, and, the occulting metal plats being thus dispensed with, the camera included a capping shutter to cover the aperture in the local-plane blind during re-setting. A further new device first introduced in this model was an adjustable lens cone by which lenses of from 8 to 10(1/2) inches focal length could be fitted and readily brought into use.
Up to this point all the cameras employing plates were operated, as regards changing the plate, entirely by hand, a system which had considerable disadvantages. Simple as an ordinary photographer would regard the operation of the changing mechanism, the fact that it had to be placed in the hands of men entirely unfamiliar with photographic apparatus called for a changing device which would be free from mishandling by the human operator. It need hardly be said that the airman has many other things to do besides taking photographs, and that he carries on his work always under the conditions of fire from enemy anti-aircraft batteries and of attack from enemy machines. Thus the next step and one which brought the aero plane plate camera almost to its most perfected form, was to provide a mechanical means of changing, operated by power other than that of the airman and brought automatically into operation immediately alter an exposure had been made. This was done in the L camera first used by the K-F.C. early in 1917. With it the operator had simply to use Bowden release in order to make an exposure: the rest- resetting the shutter and changing the plate was done mechanically and automatically. The ingenious device introduced for this purpose consisted of a small propeller mounted on the aero plane and connected to the camera by a flexible shaft. This provided sufficient power for the operation of the plate-changing mechanism, the changing gear coming into operation on the observer releasing the Bowden lever.
An improved model of this camera came into use in 1913 as the LB and has proved the most successful of aerial instruments. It differs from the type just mentioned in being fitted with a self-capping focal-plane shutter which can be entirely removed and replaced by another in case of derangement. Moreover it can be adjusted as regards slit-width by an external lever, and there is the further provision of operating the plate-changing by hand or power as necessary and of instantaneously altering it for use by one or the other means. A further improvement was the series of most rigidly made and finished lens cones, enabling lenses of 4, 6, 8, 10, and 20 inches focal length being used on the one camera.
The principle of a propeller drive for the mechanical changing of plates was also applied to a camera of much larger size, for 18 x 24 cm. plates, first used by the R.A.F. in 1918. The camera, which perhaps may be said not to have been quite fully perfected at the time of the Armistice, is fitted with lens cones allowing the use of objectives of from 7 to 20 inches focal length.
Other cameras of simpler type have been used both in the Royal Flying Corps and the Royal Naval Air Service for purposes more or less special to the requirements of these services. Certain of these are cameras fitted with a stout handle or grip, by which the instrument can be held and pointed obliquely in order to produce a type of photograph distinct from that obtained with a vertical direction of the lens axis. Thus in preparing for operations with tanks in France, photographs taken obliquely are necessary in order to yield an idea of the nature of the ground over which the attack is to be delivered; and similar oblique pictures are taken for many purposes of the Admiralty, for example, in order to obtain records of the correctness with which the masters of ships proceeding as a convoy are carrying out their instructions as to formation.
But perhaps the camera evolved for aero plane work which would provoke the greatest admiration of a connoisseur in mechanical devices is that known as the F, and first used by the Royal Flying Corps in 1916, after having passed through its trials at Farnborough during 1915. This is a camera taking a continuous series of 5 x 4 pictures on a roll of film sufficient for 120 exposures. The mechanism is operated by a propeller to that as the aero plane travels the photographs are automatically taken at intervals corresponding with a certain number of revolutions of the propeller. Simultaneously with the exposure of each section of film a tiny record is made on each (by means of a small supplementary lens) of the reading of the height of the machine and of its compass bearings so that each negative is provided with a record of the direction of flight over the territory which is being photographed.

Panoramic Photographs And Perspective.

The notes on panoramic photographs in a recent number of the “B.J.” will no doubt have interested quite a fair proportion of readers; and in all probability many more will welcome some amplification of the subject. And as there appears to be very little literature on this fascinating phase of the photographer's art the following notes are penned with the hope they may at least help the novice, even if they fail in the more ambitions desire to stimulate the production of a scientific treatise on the principle invoked. The panoramic camera is a necessity: there can be no question of that, and although much good work can be done by joining up several ordinary photographs, there are cases where all the skill in the world will fall to make a presentable picture; and an example, of this failure occurs when we have a view including railway lines in the foreground. At each join the lines meet at an angle and as we are not accustomed to trams tracing pentagons and squares, we are offended by the view. In a panoramic picture of the same subject, the lines will appear as continuous curves; so we are not asked to imagine the impossible, and therefore the eye and sense are not offended. To the professional mind in doubt, the big group is the most important class of work to which this camera can be put and here it is clearly scores that no argument is needed. These groups of course, are arranged in an arc of a circle with the camera at the centre; and the general perspective of the recanting picture, may be likened to one taken with an ordinary camera and a very long focus lens whose axis is at right angles to the same group arranged in a straight line. Now whatever carping critics may say, the man at the end of a panoramic group will he far better pleased than if it had been a wide-angle group; for he is in the same perspective as the man in the middle and this will prove a blessing to the photographer who has to copy a single figure from a group for the purpose of enlargement, and alas! in very many cases, the only available source will be front one of those big military panoramic groups and whatever consolation father, mother or sister can get from the finished enlargement, it will be all the greater from the fact that their departed hero is delineated in tine which would not be the case in the figure were copies from near the end of a while-angle group.
The thing that is most objectionable about a panoramic view is when something that we know must necessarily be straight comes out in the photograph as a pronounced curve. There are two ways to avoid this: one is by the arrangement of the subject, as in the case of a group, or by the selection of the point of view. Now, in general a horizontal straight line, except when it radiates from the camera, appears in a panoramic photograph as a curve: and, conversely, there is a certain curve which, when in a horizontal piano with the camera at its origin, will always appear an a horizontal straight line; and if we know the nature of this curve, we shall be in a better position to order the arrangements for any particular photograph we wish to take.
Let us take a practical example:-Fig. 1 is a diagrammatic view of Ludendorff, on horseback, giving a farewell address to his troops; and perhaps adding a few words of advice and warning mi the disastrous consequences of a complication of Prussian microcephalism and Asiatic beriberi. In the ordinary panoramic parade photograph the men dwindle away towards each end of the picture, and form a strange curve that would remind a soldier more of some lamentable straggle with the theory of a trajectory than of invincible, Vandalia, martial glory and also it offends all our ideas of perspective. And besides, perhaps, Ludendorff would not like it; he might think yon were puking fan at him, and intended some sly allusion to "elastic fronts." The remedy is to get the valiant soldier to let you arrange the men; and to get this effect of straight lines vanishing to the horizon, as in Fig. 1. they will have to be arranged in the form shown in plan by
90 degrees
Reciprocal Spiral
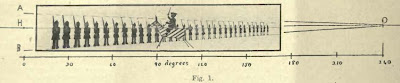
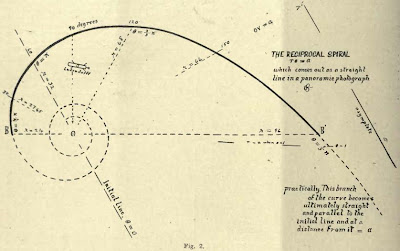
the heavy line in Fig. 2. If we are using a 12-in. lens; and decide to have the finished picture about 40 inches long, the group will have to be included in an angle of about 180 degrees; because12^=37¾ nearly, which will allow just a little margin each end. If we further decide that the nearest soldier shall be three inches high in the photograph, and the one at the remote end of the line one-quarter that being then, by the simplest arithmetic, the nearest man must be 24 feet from the camera, and the furthest one 86 feet; and, as the group is to include 180 degrees these two men and the camera will be all on the same straight line. This is shown t., scale in Fig. 2, where the position of the camera is given by o, and B and B’ are the places of the and men. The setting out of the rest of the curve is quite simple if we remember that the panoramic projection of the horizon is a straight line, and every length of a panoramic photograph represents an equal angle or number of degrees; that is to say, if three inches at the end of a Pangram represents 15 degrees, then also three inches from the middle will represent exactly the same angle, and if the line B O, joining the men's feet in Fig. 1, is to be straight, the vertical distance between it and H O must diminish by the same arithmetical amount for each equal length of the picture; and as the distances from the camera must be inversely as the height of the figures, we have the clue to every point of the curve. Now, let us calculate the distance of the curve from the origin o for every 30 degrees. As the total fall in height is to be 3-¾, and 30 is contained six times in 180, then
Formula #1
is the amount required; and in the table below the distances of the points are given in feet for every 30 degrees, while the heights of the image are given in eighths-of-an-inch, to avoid fractions and show better the regular decrease.
Distance in feet
In regard to this table it may be observed that the product of the height and distance is a constant quantity. A group arranged in this way will, in the resulting Panorama, have the same general perspective as Fig. 1 though course each element of the picture will have the perspective peculiar to the lens with which it was taken.
Now if the lines AO and BO are continued they will meet outside the picture, at the vanishing point O n the horizon; and if we call the vertical distances between A and B h and the number of degree from H to O, which in this case will be 240 deg., then for every degree the height will decrease by; therefore at any angle ß. measuring from H. the bright of the figures will be: -
Formula #2
and the distance from the camera to the curve of this point will be: -
Formula #3
It will be been that is a constant quantity which we will call a; and a ­ ß is a variable angle which we will call; then, substituting and patting r for the variable radius we have: -
Formula #4,
and, clad in this classic garb, readers who have dwelt in the seventh heaven of mathematical bliss will recognize in old friend, the "reciprocal spiral." To show the nature of the complete curve it is continued in the diagram at each and by broken lines, and towards the origin it approximates more and more to a circle with every revolution it makes recording to the law –
Formula #5
where ra is the radius at the nth crossing of the initial line and by taking a and n of suitable dimensions we can get as near as we like to any tiled circle. By making is very small the whole curve approximates to the initial line; and if we take it small enough we have the special case of the radiating straight line. This from this spiral we can get in our photograph a right line at any degree, of obliquity and perhaps enough has been said to make clear the general law: -
The panoramic projection of a reciprocal spiral in a horizontal plane with the camera its origin is a straight line and only this carve or some special phase of it is so rendered.
But in all probability it would be as difficult to get a photographer to look at a formula of this kind as it would be get Ludendorff to let you arrange his men; so perhaps a better way would be to plot the curve to several valuations, then equal lengths; and this would give a rapid approximate way of finding what one wants.
Before leaving this subject there are several practical points consider. Where shall we put Ludendorff? In Fig. 1 it will be seen that the centre-line of the picture passes through the horse's head and therefore, he must be placed so that the mid-angular line in this case the 90 deg. line passes under the head of his charger. Another point to consider is what would happen if; instead of terminating the group at B and B we continued it along towards the originals far as the curve is
Bromide Paper
marked out in the diagram by the broken line, and also at the rather end along the straight for half a mile or so; and then starting the Circuit camera at the beginning of the group, let it run round for two and a half revolutions? Still keeping to the 12-in lens, we should want a 16-ft. film for the job; but to see the sort of thing we should get, draw a long rectangle in represent the picture (Fig. 40). The group will begin three tines over and end three times, and if we draw a straight line from the bottoms left-hand end of the rectangle to the horizon at the other end to show the line upon which the complete group is standing the diagram will be completed by a line of 240 deg. and one of 180 deg from the commencement of the picture and two lines of the same lengths at the end; and as these short
represent the picture
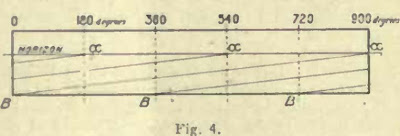
lines are necessarily repetitions of parts the long one, all live will consequently be parallel to each other.
The practical outcome of all this is what every user of a panoramic camera knows: avoid such a position that gives a straight line, which in perspective ought to be parallel with the ground line; if we can get to something like 45 deg. from this position the curvature will, as a rule, be quite
negligible; all radiating lines, and also parallels to these lines if a fair distance from the camera, will be straight in the resulting panorama because, like the circle, they are special phases of our spiral.
Knowledge of the rigid conditions for a straight line will do the operator no harm and even sometimes be helpful to the practical man.
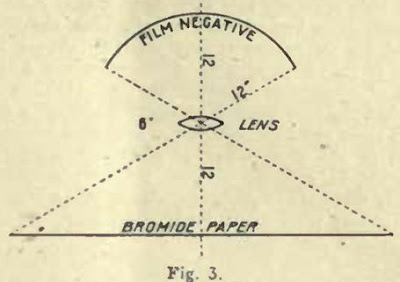
When only a moderate angle is included in included in a panoramic view, it is not beyond realms of feasibility to bring the pictorial into ordinary perspective by spying: the only conditions necessary being to bend the negative into the same curve that it had during exposure; and then project the image by means of a lens at the centre of the curve on to a flat to a line passing through the centre of the curve and the middle of the negative. This is shown in Fit 3, where we may suppose the negative was taken with a lens at 12 inches focus, and is therefore bent into a circular arc of 12 inches radius, and is being copied with a lens of 6 inches focus, which will give us a copy corrected as regards perspective, and of the same size as if the negative had been taken in the ordinary way with a 12-in. wide angle lens. Of count, the corrected copy will be longer than the panoramic view. In regard to the optical system, it is not at all necessary to have an anastigmatic; some old-fashioned thing with a field as round as a football will do better; and perhaps a thin spectacle lens with a small stop right in contact with the glass best of all. Or, of course, the lens could be rotated during exposure; but then we should lose the advantage of roundness of field. Some years ago a lady took a picture of a castle in Scotland with an Al Vista camera, held so that the lens made a vertical sweep. The towers of the castle came out like barrels, but a correct bromide print was made in the way indicated above. A special optical system would have to be devised to cover anything more than a very moderate angle, and, in many cases, true perspective over a very wide angle would prove more objectionable than panoramic projection.
In the Cirkut camera we have great advantages: we can include any angle up to 360 degrees or more; we can focus; and we have usually three different foci to choose between; but, in the matter of range of time of exposure, it is the biggest sinner of all the panoramic cameras. The quickest exposure is literally too slow for a funeral, and the longest possible time you can give is too short for a dull subject on a dull day. In cameras of the Al Vista and Panorama class, we could tackle ordinary hand-camera subjects on a bright day; and for a still subject on a dull day we could fix the camera on a steady stand and increase the exposure to anything we liked by swinging the lens to and fro as many times as necessary. And on some patterns of the Al Vista a brake, in the form of an air vane, was fitted, which not only increased the exposure, but also amused the group while it was being photographed.
In the matter of fitting new lenses to panoramic cameras this, in general, is impractical, except in the case of the Cirkut camera, where a new lens will mean also a new set of pinions and the number of teeth to the pinions will be inversely as the foci of the lenses. There will be several points to attend to in making such a substitution, which are of more practical interest to the camera maker than the photographer.
In view of a recent patent for a camera in which the image is received on the inside of a cone, it may be as well to define panoramic projection as used in the above article as the projection by straight lines from points on the object through the centre of a vertical cylinder on to the cylindrical surface itself; the intersection of these lines with this surface forming the image, which is afterwards viewed when the cylindrical surface is spread out flat to form the panoramic picture.
C. J. STOKES.

Rabu, 13 Agustus 2008

Soft Effects In Enlarging.

[The facility and economy making portrait prints by enlargement are advantages of a system which is growing in favour, and which has a further claim to the notice of photographers namely, the opportunity which it affords of producing a portrait of diffused definition from a negative of the ordinary character. This is a point which receives special emphasis in some notes on enlarging which we reprint below from "Camera Craft." Their author, Mr. J. Walter Doubleday, describes the particular form of device which he employs in breaking up to a pleasant degree the definition in the negative. EDS. B.J.]
Bromide enlarging is steadily growing in favour, even more rapidly than would be the case were only those workers taking it up who are changing from the formerly popular view camera sizes to the present more convenient small type of cameras. I know a number of professionals who are making all their portrait work through the enlarging lantern, not alone for the purpose of securing larger prints than the negatives they care to make, but for the control and speed that the process permits. They have, of course, some- what modified their apparatus, by eliminating such parts as serve mainly to give a large range as to size, and by adding other fitments that increase rapidity of production.
I have mentioned thin, not as an introduction to the subject of apparatus, which I shall avoid, but as a means of suggesting the recognized simplicity and advantage of making prints in this way. Enlarging apparatus is of such varied form' depending upon the light available, the requirements of the user, and to some extent the pane M well, that space does not permit me to do the subject justice if I am to record a few of the things I have learned about the actual production of bromide enlargements, things common to the work, irrespective of the form of apparatus used. Enlarging on bromide paper is quite simple, the apparatus required is not complicated, and the results have the highest endorsement of our best professionals and our leading exhibitors.
The negative best suited for enlarging is one that is soft, yet brilliant. But it must be brilliant. The kind of softness that "results from full development of an over-exposed plate or film, soft- ness combined with thickness, will not give a good enlargement. Slight fog or veiling of the image is also detrimental, and one must not assume that because such a negative will make a good contact print it should produce a good enlargement. This is a common mistake. The reason for the difference lies in the different action of the light. When the light is projected through such a negative in enlarging, there is a scattering of light from all portions is of the silver deposit, and when there is even a slight deposit where it should not be, as in the case of fog or thickness, poor results must follow. In contact printing there is not this scattering of light and not the same ill effect produced. One should strive for brilliancy with softness, and the use of a lens shade, particularly in the case of our rather short hooded and large aperture instigates, will do much in that direction. A safe dark-room light and a clean working developer will also heap.
The strength of the light used in making the enlargements also has much to do with the quality of the negative best suited to the n' requirements. Or rather, one can, by selecting a certain form of light, accommodate the process to negatives of quite different quality. The thin, fully exposed, yet under-developed negatives that some professionals affect, can be made to produce good enlargements only by using a rather weak tight, such as an oil burner or gas jet produces, strong, contrast} - negatives require a strong light; and negatives carrying much retouching are beat enlarged with well diffused daylight or a strong artificial light, like the arc, with ground glass between it and the condenser. The use of a soft-focus lens is also moat advisable in such cases.
The truth of the matter is, she best plan is to find oat, by experience, just what kind of negative is best suited to one's individual equipment, and then make negatives as near that standard as possible It is quite obvious that only a worker with an extensive output to produce could equip himself with sporrans employing varying strengths of light as suggested above. A compromise, to grades of paper offered; the range, since the introduction of the on-called chloride papers, with a speed some where between that of regular bromide and the gaslight papers, ranking this power of selection a valuable asset.
I suppose I should attempt to go into same detail on this latter point, bat while the mage is so wide, it is yet somewhat variable in different localities, and little would be achieved. At leant, little compared to what the individual worker can best find out for himself by a very few experiments based upon the quality of the negative in hand and the maker's description of the various papers available in his case.
The exposure is the most troublesome factor of the entire proems, but this has lost its terror to a great extent since the advent of developing papers. In the days of printing out papers, with their visible image to serve as a guide, the correct timing of a bromide enlargement screed to be much more of an achievement than was actually the ones The best plan, in my animation, is to take such negative, as made, and give it Bomber that expresses something in the form of a ratio, something that will give an easily handled factor from which to figure the exposure in enlarging to any size. This can be done by making n correctly timed contact print on developing paper and noting the time, the time serving as the factor number. It is, of course, quite necessary that these factor numbers most all be determined under exactly the same conditions. A standard brand of paper must be used, one having little or no variation in speed, and the light and distance used in malting the print mutt also be uniform.
If all one's negatives bear on their edge the number of second’s exposure required to produce a correctly timed print on, say. Regular Velox, exposed to a cluster of four thirty-two candlepower Mazda lamps at a distance of sixteen inches, little difficulty would be experienced in determining the correct exposure for any one of them for any size of enlargement, after a few experiments had been made. There would be a fixed relationship between these factor numbers and the number of seconds required for enlarging to different sixes, sad the relationship could be easily determined by an experiment or two. One might find that the exposure required for a two time allurement, or enlargement to a certain commonly used size, was one and one-half times the exposure number established by the making of the contact print on developing paper. He then has but to read off the umber on the margin of one of his negatives, multiply it by one and one-half, and he has the correct exposure for an enlargement of the designated size, providing that lens stop, strength of light, and grade of paper remain constant. If any of these are varied, proper allowance is easily matte. A larger for smaller stop decreases or increases exposure in the same ratio as in regular work; the difference in the speed of the papers used is determined by experiment, sod of coarse one's light is practicably constant except daylight is employed In this letter case an inclinometer can be used to determine the variation from the normal, if any. Practically all of the annuals carry a table giving the relative exposures for different degrees of enlargement, and 1 hardly need to occupy spare with a repetition of one of them here. Soft effects in enlargements are sometimes quite desirable, and we know of several forms that are making quite an enviable reputation on their bromide enlarging by using the legs pronounced effect secured with the soft-focus lens employed for all their work. But all obtainable sharpness is often desirable, and we must be prepared to secure this last before we can regulate the amount of diffusion to our liking. Some workers find it very difficult to secure a satisfactory degree of sharpness, even from a negative that is undeniably sharp, and we will therefore take up a few of the possible causes for their difficulty. First, there is often an unsuspected lack of accordance between the chemical and the visual image projected by some lights, particularly the enclosed are. Where this is the case, the variation must be determined by trial and allowance made for it in focusing. While the difference varies slightly with the size of enlargement, only the general difference need be considered and made up except where an unusually large stop is being employed. Where a condenser is used, failure to adjust the position of the light for different sires of enlargement will also cause lack of sharpness. The light should be so placed it is lathe focus of the condenser for revs of light from the caser; in other words, the cone of light, after passing through the is, should come to a point small enough to pass through the stop of the lens. The distance of the light back of the condenser for different positions of the lens which last means different size of enlargement, can be determined by focusing through a negative upon the easel for the desired size, then removing the negative and observing the distribution of the illumination as the position of the light is changed. Another frequently unsuspected causal of unhappiness is the use of the rising and falling, or the cross front, in bringing the image in the desired position on the easel. The centre of the lens, of the negative, the condensers and the light, should al be in a line and not oat of centre with each other. It is also obvious that the lens carrying front of the camera or enlarging lantern must be in a plane parallel with that of the other elements, or this cent ring of the lens cannot be achieved. Dirt on the lens or vibration of some part of the apparatus during exposure is detrimental, and the bromide paper should lie perfectly flat against so as to receive the image in the plane of critical sharpness.
Soft effects are, as I have said, frequently the most desirable, both for pictorial and other reasons. A hard, black mass with a harp outline, is much more objectionable than one with a softer edging, as any landscape worker can testify, if he has given the matter any thought. In portraiture, the breaking up of all suggestion of hard lines is almost sure to result in improvement. With the soft-focus lenses some moat planting results are secured, and it might be wail to point out that different makes of these lenses give somewhat different result*. The worker will, if buying a lens of this type, do well to try more than one and decide for himself which beet suite his requirements. Bolting silk, stretched on a frame and interposed about three or four inches in front of the paper on the easel daring all or a part of the exposure, is a quite common method of securing a breaking up of the image. The distance from the paper regulates the amount of breaking up achieved, and this distance again depends upon the distance of the paper from the lens. A more delicate softening is secured by using two thicknesses of chiffon to face a cap placed on the lens.
In my own practice the mount on the lens is fitted with a wire frame in which a movable slide is held close against the front hood, This slide is a piece of cigar-box wood about three times as long as it is wide, the width being sufficient to well cover the front of the lane. The centre of this slide is left solid, but a circular opening, large enough to permit free passage of light to the lane, is cut is each end. One of these openings is covered with two thicknesses of the chiffon material and the other with a piece of yellow glass, both let into the wood so as to be flush with the surface. With the centre of this elide in front of the lens, the cap is on; with the yellow screen in positioning, the paper on the easel is in safe light while being adjusted in position; and, with the chiffon section in front of the lens, my soft enlargements are exposed. One could make the slide longer and include an unscreened opening, but in practice I found that lifting the slide out of the wire frame was less liable to shake the lens than trying to move it along in the proper position.
Even more important control of the results ill enlarging can be secured by shading different portions of the image during exposure; or rattier, during a portion of the exposure. A piece of cardboard, an old mount, preferably of a dark colour and roughly torn to the desired outline, serves at the shading medium and is to be interposed between the lens and the easel, or at least, some little distance from the paper. This .should is kept in motion during the time it is being used, in order to further avoid a too sharp outline, the length of time it is interposed being proportioned to the entire exposure in accordance with the amount of holding back it is thought desirable. It is obvious that where the part to be held back comes fully within the boundaries of negative, this plan will not avail. One can then resort to a piece of the card torn roughly to the desired shape and fastened to the end of a piece of stout were; an ordinary lady's hatpin answering admirably. Another plat is to attach the .shading piece to the centre of a piece of glass and use this last as a support to enable it to be gently moved about so as to shade the part intended. Variations of these suggestions will suggest themselves to the worker and enable him quite rapidly to acquire the knack of exercising most beneficial control of nearly all his enlarging work. In fact, it will be found that practically every negative from which an enlargement is required is amenable to treatment of some kind along this line.
I might point out that availing one self of these possibilities makes it advisable to increase somewhat the exposure time, and this last is best done by some other means than decreasing the size of the stop. The most practical method is to introduce one or more sheets of ground glass in front of the light employed. Using a slower paper may not give one just the effect desired different speeds of paper printing differently, and decreasing the stop affects the illumination where a condenser is used and sometimes introduces granularity in other cases, even resulting in an enlarged image of the ground glass diffuser behind the negative being recorded upon the enlargement

J. WALTER DOUBLEDAY.

An Easy Method Of Silvering Mirrors.

         Morison silvering is an operation which is avoided by most photographers as a process in which the successes are few and for the favored. After several failures with the tartaric acid sugar reducing agent for silvering glass, the present writer cast about him for some simpler and more rough and ready method of preparing a reflector for his camera. It has long beam known that it is possible to produce silver minors by the use of formalin as a reducer. The method, however, has not come into practical use because the deposit of silver is usually so granular that it will rob of the glass upon the least touch. The following formula provides a means of silvering glass and ether substances with ease and rapidity, and the process is a fascinating one to watch.

STOCK SOLUTIONS.
Stock Silver.

Silver nitrate………………………45grs. 3gms
Distilled water…………………….10ozs. 300c.c.s

Stock Formalin.

Formalin (40 p.c. Formaldehyde)....1oz. 45gms.
Distilled water…………………….10ozs. 450c.c.s.
Methyl Violet dye…………………10grs. 1gm.
Thaw solutions improve on keeping.

         The following quantities are sufficient for 20 square inches of glass allowing for waste silver being deposited on the dish and elsewhere.
         Take 3 ozs. (90c.c.s.) of the stock silver solution and add 10 per cent, ammonia solution drop by drop (a fountain pen tiller is heady for this), shaking the mixture after each addition. The mixture first becomes turbid, and then gradually clears. When dear, atop adding ammonia. A slight excess of ammonia is not detrimental. In another receptacle poor out 3 drachmas (11 c.c.s.) of the stock formalin solution.

The Silvering Process.

         Take the piece of glass it is intended to silver, and clean it well with whiting and water, or by any other method that may in favored, and rinse it under the tap, swabbing the surfaces with cotton wool. Now rub the wet face of the glass with another piece of cotton wool which has been soaked in the following priming solution:

Tin Protochloride (Stannous Chloride) 26 grs. 1gm.
Water ………………………………….10 ozs. 200 c.c.s.

         Ordinary tap water will do. This solution should be thrown away when done with.
Rinse the glass under the tap and wipe it with a piece of cotton woo) which has been dipped in distilled water.
         Place the glees face up in a developing dish which has previously been cleaned with nitric acid and rinsed with distilled water. The next operation is to add the formalin to the ammoniosilver mixture, and immediately pour into the dish, and to rock the dish well.
         The silver begins to deposit at once on the primed surface, the solution becoming darker after a short time, and then slowly clearing. After from one to two minutes the solution reaches its maximum clearness, the by-products of the reaction forming into little grannies. At this point ran tsp water into the dish and lift the mirror out and rinse it, finally swabbing with a soft piece of wet cotton wool.
         Allow the mirror to drain for a minute or two, and remove any drops of water from the surface by lightly touching them with a piece of blotting paper. After half an hour or so the mirror should be quite dry and ready for burnishing.

Finishing the Mirror.

         When dry, the mirror should have a brilliant surface, with a slight yellowish tarnish, which must be removed by polishing if the front of the mirror is to be used as a reflector.
         For polishing and burnishing the surface, take a piece of a couple of inches square, or, failing this, a piece of really soft cotton rag, and tie it round^ a plug of cotton wool, to as to form a medium soft pad. Keep this in an old plate-box with some rouge. The rouge may be bought at a chemist's, or in some households purloined from the feminine dressing-table. Jeweler’s rouge is sometimes too coarse. The wash-leather pad should be lightly charged with the rouge.
         Warm the mirror and the pad slightly so as to be sure that no moisture is present, and then lightly rub the surface with rapid small circular motion. The mirror will take a brilliant polish and is then ready for use.

General Consideration.

         Practically speaking, the hotter the glass 'before applying the silvering solution, the whiter and more granular the resulting mirror will be. Cold solutions produce quite a good deposit, which is dark in colour on the surface, but which takes a brilliant white polish. The best temperature is about 70 to 80 F. It is a good plan to have the glass a few degrees warmer than the solutions. This can be accomplished by immersing the glass in tepid distilled water for a few moments before silvering.
         Celluloid may be easily silvered by exactly following the procedure as for glass.
Mirrors may 'be silvered face down if desired. It is a question more of convenience than actual merit.
         Silver may be prevented from depositing on unwanted parts by painting those portions with Vaseline or celluloid varnish previous to priming with the tin solution.
         Spent solutions are hardly worth saving, even when there is a quantity. Most of the silver in the solution comes down as actual mirror surface.
Methyl violet dye has the property of keeping the surface of the mirror brilliant and unclouded. Its action is analogous to that of bromide in a developer. It may be omitted if not available.
         The priming bath gives a much more adherent coating. It also has the property of attracting most of the silver to the working surface, instead of too generously distributing it on the sides, and bottom of the dish. It is supposed that a silicate of tin is formed on the surface of the glass. This, however, cannot 'be the case with celluloid or other non-glass surfaces.
         The cost of silvering 20 square inches of glass, reckoning silver nitrate at 4s. per oz., is about 2d. As failures cost as much as successes, it is a good plan to practice on small pieces of glass before attempting a larger surface. One has, for example, to learn how to clean glass properly.
         Well boiled-water can in most districts be used instead of distilled water.
         As a protection against oxidation, the mirror may be varnished with celluloid varnish. The coating of varnish should not be too thin or it will dry with a smoky surface. No other varnish is suitable for the purpose, because silver reacts with most gums, etc. It is, however, easy to resilver a mirror when the surface is worn away by repeated republishing that in most oases it is hardly worth while to decrease the efficiency of the reflecting surface by varnishing it.
         Measures, beakers, and dishes should be cleaned after us& with strong nitric acid, or the remnants of silver will give trouble when the vessels are used for other purposes.

JAMES GRAHAM.

National Development.

There are many ideas as to what is the correct way of developing a negative, and the exponents of each claim that theirs is the true and only way. There is no accepted standard for goodness in a negative, which is perhaps a good thing, for its absence allows of individuality in the finished result, although this must not be confused with "fluking," which is what happens when an operator aims at one effect and obtains quite another, which he is astute enough to put forward as a premeditated piece of work. The clever photographer is the man who starts with a definite idea for a picture and by skilled technique realizes it in a print. To do this one must have perfect control of exposure and development. The best lighted figure may be made either hard or flat by incorrect exposure, while a correctly exposed plate may be made to yield a thin soft image or a dense harsh one by injudicious development.
To ensure even quality it is very necessary to keep to one brand, and preferably one grade of plate. The best technician in the world could not produce a dozen negatives of even quality from twelve plates of different makes and rapid ties even if all had received an equivalent exposure. Plates vary greatly in the time taken for development and in the appearance of the image before fixing. A common way of judging the progress of development is to look for a trace of the image on the back of the plate. This can only be done if one brand of plate is in use, and then only to a limited extent, as this method is quite upset by variations in the thickness of the emulsion coating. While upon this subject it may be useful to correct an error sometimes made, which is, that when the image is clearly visible on the back of the film, the utmost density which the plate will give has been obtained. We had a case under our notice some few months ago where the operator proposed to change his plates, because, although he developed them right through to the back, the images were always thin. On our suggestion he allowed some plates to remain in the developer for three minutes longer than others, which he fixed at 3 usual times, and was convinced by the difference in density that his development had always been carried on for too short a time.
One of the old errors was that the best results could only be obtained by what was known as "tentative development." This meant starting the development with a minimum of alkali, which was gradually added as needed. There was some reason for this when ammonia was used as the alkali, as volatilization rapidly reduced activity of the solution, and fresh ammonia was needed to complete development. When the fixed alkalies in the form of the carbonate of soda and potash came into general use the “working up" by adding small quantities of alkali to the developer fell into disuse, although a few old-fashioned workers still practice it.
It is not our purpose to recommend any particular developing agent as superior to the others. Some developers have the reputation of giving thin images and others plucky ones, but this is largely a question of dilution and temperature. Next to exposure, this decides the possibilities of the negative, coney’s length of development with any given solution. With normal exposures short development gives a thin flat negative and development gives the maximum of density and contrast. Between these extremes the operator must choose for himself. All non-staining developers, such as am idol, hydroquinone, and many others yield a negative of which the printing quality is due to reduced silver only, but pyro behaves differently, the silver image being reinforced by the "pyro stain." It is generally acknowledged that a pyro-developed negative will usually give a more brilliant print than one of apparently similar density, but free from stain. This is due to the fact that the stain is deposited in proportion to the density of the image, and is not uniform all over the plate. If such a negative be dissolved away, by using Farmer's reducer, it will be that a thin brownish-yellow image remains.
One of the commonest errors in development is to over- develop under-exposed plates, and to under-develop over- exposed ones This is caused in the first place by the desired to force out all possible detail in the shadows, the result being that the high lights are made so dense that any shadow detail is lost in the necessary depth of printing. In the second case the over-exposed plate is under- developed because the whole surface of the film quickly blackens, and the operator fears that the detail will become buried. This is quite wrong; the proper course is to develop for the full normal time, and to dissolve away the fog with the ferri-cyanide reducer. It may be noted here that it is of little or no avail to add bromide to the developer after the image is well out; to be effective, bromide should be added to the developer before pouring on the plate.
The degree of dilution of the developer has an important effect upon the negative. A weak solution can be used until all the details of an under-exposed plate are brought out, without obtaining too much intensity in the high-lights. Concentrated solutions give the maximum of contrast, especially when a little bromide is used in addition.
Too prolonged development will give a general chemical fog, and an excess of alkali often added in cases of under- exposure has the same effect. A disagreeable colour, not quite a fog, is caused by putting plates developed with am idol or metol direct into the fixing bath without rinsing. With pyro the fixing bath rapidly becomes discolored, but with the non-stain developers a large quantity of solution can be carried over into the fixing bath without altering the colour very much.

Assistants Notes: Specialization and Efficiency.

Ringkasan ini tidak tersedia. Harap klik di sini untuk melihat postingan.

Minggu, 10 Agustus 2008

EX CATHEDRA: Enemy Cameras; Cycle Portraits; Gaslight Enlarging; Quality of V.P. Negative; Transferred Bromides.

Enemy Cameras.

We are glad to see that our contemporary, "The Photographic Dealer," is actively interesting it self to put a stop to a species of trading with the enemy which, though small in amount, is nevertheless quite indefensible. It appears that in Cologne and other places in the occupied portion of Germany cameras of German make can be bought at not a very much higher price than that before the war, yet one which at the greatly depressed value of the German mark enables the buyer to dispose of the camera at a good profit on bringing it to London. It is stated that dealers in London are being asked to purchase these instruments. The Photographic Dealers' Association has taken the matter up, and it may be hoped that prompt measures will be taken to see that this illicit trading is speedily topped. There can be no objection to Arm y officers in the occupied country buying such photographic supplies as they want from the only available sources, namely, the German dealers, but the practice of snatching a paltry profit by bringing the cameras to London for sale is one which surely should be immediately prohibited by the authorities on their notice being drawn to it.

Cycle Portraits.

We were recently shown a most artistic portrait photograph of a feminine client of a professional friend. The lady was riding her bicycle along a delightful stretch of country road. The portrait was a really delightful piece of work, and showed to perfection the poise of the head, the easy carriage of the rider, together with the perfect grace with which some women have learnt to cycle. This is an idea that might be well worth following up, for if well done a portrait of this kind should be a good business bringer, and is far in advance of the portrait in which a stationary cycle "ridden" in the studio. The real thing offers no special difficulties in the way of making a satisfactory picture, nor need the operator think that a reflex is essential. A good hand-camera is desirable, but the picture to which we refer was made with an ordinary field camera. In this case the picture was focused on the ground glass, the cyclist being requested to stand on a certain spot marked with a couple of smallish stones. She then retired, and rode slowly towards the camera for the exposure to be made. It will be found best, if possible, to make the actual exposure while the cyclist is free-wheeling, in order to lessen movement as much as may be, and for this, in order to obtain the best effect, the pedals should be horizontal or at the "quarter to three," the correct free-wheeling position. Rapid exposures are not needed; a 25th of a second at f.8 on a bright day with fast plates will be found to give a good negative. There is no reason why this plan should not be applied to male customers as well, for many persons of both sexes lend themselves when cycling to most graceful and pleasing poses.

Gaslight Enlarging.

The trade enlarger, whose work lies not only in the enlarging of negatives of reasonably decent quality such as he obtains from professional photographers, but also those of the quite unskilled amateur, has reason to ignore the advice which is sometimes given, namely, that the speed of modern bromide paper renders the use of a very high-power source of light unnecessary. It is quite true that the practice of some enlargers of keeping an oil lamp for the enlargement of particularly weak negatives on to bromide paper is one which contributes to a greatly improved result; but, on the other hand, a great deal more can be done if a high-power light such as an arc is available, and the enlargement made on one of the extra-slow gaslight papers, such as Cyko or New Kodura. The degree of brilliancy which in this way is obtained in an enlargement from an utterly miserable negative requires to be seen to be believed, and we have known of enlargers denying the making of such results except by the production of a new negative. The amateur enlarger can obtain them with his customary apparatus if he is prepared to let exposures run to as long as half an hour, but for commercial work a light of the power of an arc or mercury vapour is, of course, a necessity.

Quality of V.P. Negative.

Now that there is an ever-increasing tendency on the part of Press, commercial and professional photographers and serious amateurs the use of vest-pocket cameras, many are finding that their technique is decidedly faulty. It is certainly easier for the less skilful to make technically perfect 12 by 10 negatives than to produce an equally good result from a vest-pocket size negative via enlarging. The ideal result depends mainly upon the worker knowing what kind of negative to aim for. The general tendency makes these negatives too dense, and if this is the case of course the enlarging process will be found to make harsh contrasts all the harsher, and to lose the fine tonal qualities of the negative. It would be a good plan for the photographer who contemplates using a miniature camera as a supplementary instrument to make half a dozen exposures by the aid of the meter taking care that these are on the full side and develop them so that each is a lightly further developed than the previous use. A bet of enlargements from the negatives will show exactly what is required. Great care is needed to prevent mechanical drainage such as acratches, etc., and we favour the tank and time method of dealing with the exposures made with vest-pocket cameras. Grain must also be avoided but with a suitable developer used fairly diluted this ought never to prove troublesome.

Transferred Bromides.

Now that bromide paper is the almost universal printing medium with many photographers more attention might with profit be given to the transfer variety which if carefully used may be the means of imparting an individual and artistic expression to photographer work. We can recall a case recently in a large exhibition where considerable attention was attracted by a picture upon one of these papers. The whole effect was most original and uncommon. The other day we noticed some cabinet-sized per traits upon quite large mounts in a certain photospheres show-case. Examination revealed the fact that they were originally made upon one of these papers and transferred to the mounting paper. A delicate tint was worked in round each print with water-colour, thus imparting a most delightful finish. This offers a considerable saving over the plan sometimes adopted of making the prints upon large sheets of paper and carefully masking off the picture, while the result is to all intents and purposes the same. That the picture is reversed by the transferring has never to our mind been a serious objection to the process, as the average sitter would quite fail to notice it, but if the operator's intention is to use the process in carrying out some definite scheme the plate may be put into the elide, glass side to the lens, and the slight difference allowed for when focusing. The back of the plate should be carefully cleaned, and the film protected from abrasion by the metal dividing plate of the slide. For this there is nothing better than a piece of card covered with black velvet cloth.